
Optimize images on S3 with AWS Lambda and Serverless
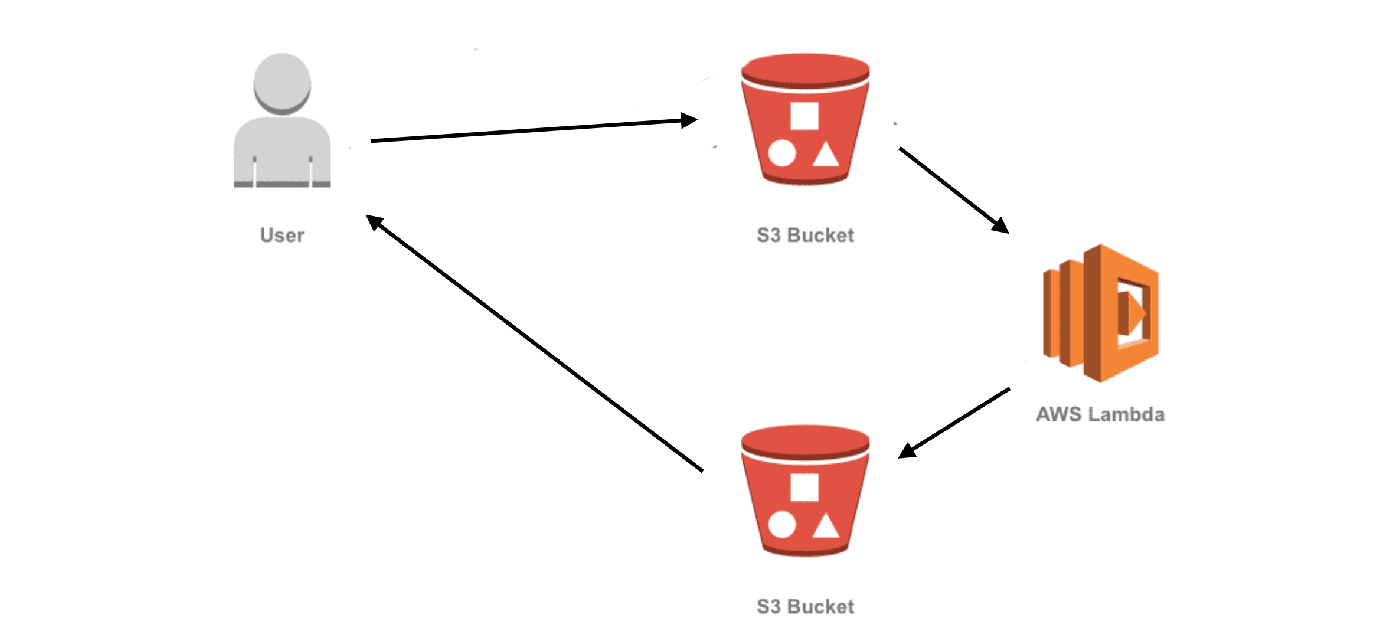
An image is uploaded on S3, that triggers a lambda that optimize that image and put it back. How hard can that be?
It was way more tricky than I thought, especially since Im not used to the Node ecosystem. So here I am sharing my research and result. I hope it can be useful.
Requirements
I wanted to use javascript because there is native support for Node on AWS Lambda. I am also under the impression that there are tonnes of great node libraries that help me optimize images. Node8 is soon to be deprecated on AWS lambda so why not start using the latest and greatest Node12.
I want to optimize the image once and store it back on S3. I dont want to optimize it on demand. I dont want it that dynamic, flexible and resource heavy.
I also want to use the Serverless framework because that is what Im using when deploying my PHP applications.
The code
The code is not too complicated. It is just about 100 lines and if you can stand reading this many anonymous functions
you will be alright. I talk about it from top to bottom and later you will see the full index.js.
First we require a bunch of stuff. We need ImageMagic and Imagemin + some plugins. Note that I change the binPath
of ImageMagic… more about that later.
var async = require('async');
var AWS = require('aws-sdk');
const gm = require('gm').subClass({imageMagick: true, binPath: "/opt/bin"});
const imagemin = require('imagemin');
const imageminJpegRecompress = require('imagemin-jpeg-recompress');
const imageminJpegtran = require('imagemin-jpegtran');
const imageminPngquant = require('imagemin-pngquant');

// get reference to S3 client
var s3 = new AWS.S3();
I now define a function that returns 90% of the available memory on the lambda. Then I start reading the S3 event.
I’ve decided to upload all images to a folder named uploads and the optimized images will go to the optimized
folder.
const getEnableMemory = () => {
  const mem = parseInt(process.env.AWS_LAMBDA_FUNCTION_MEMORY_SIZE, 10);
  return Math.floor(mem * 90 / 100);
};

exports.handler = function (event, context, callback) {
  var bucket = event.Records[0].s3.bucket.name;

  // Object key may have spaces or unicode non-ASCII characters.
  var filePath = decodeURIComponent(event.Records[0].s3.object.key.replace(/\+/g, " "));
  var dstFilePath = filePath.replace(/^uploads\//g, "optimized/");

  var typeMatch = filePath.match(/\.([^.]*)$/);
  if (!typeMatch) {
    callback("Could not determine the image type.");
    return;
  }

  var imageType = typeMatch[1].toLowerCase();
Now I start the actual work. I use async.waterfall which will run each anonymous function in order.
I will start by downloading the image from S3 into a buffer.
  async.waterfall([
    function download(next) {
      s3.getObject({
          Bucket: bucket,
          Key: filePath
        },
        next
      );
    },
    function ...
Next I use ImageMagic to do some small optimizations like turning the image the correct way and removing metadata. I also tell ImageMagic not to use too much memory.
  function transformBuffer(response, next) {
    gm(response.Body)
      .limit("memory", `${getEnableMemory()}MB`)
      .autoOrient()
      .size(function(err, size) {
      this.toBuffer(imageType, function(err, buffer) {
          if (err) {
            next(err);
          } else {
            next(null, response.ContentType, buffer);
          }
        });
    });
  },
  function ...
Now I optimize the image with imagemin. Nothing fancy.
  function optimize(contentType, buffer, next) {
    imagemin.buffer(buffer, {
      plugins: [
        imageminJpegRecompress(),
        imageminJpegtran(),
        imageminPngquant({
          quality: [0.6, 0.8]
        })
      ]
    }).then(function(optimizedImage) {
      next(null, contentType, optimizedImage);
    }, function (err) {
      next(err);
    });
  },
  function ...
Aaand it is time to upload the image again. I also set some cache control headers. I say that this image is good to save for 10 years. I also say that this is “immutable” and will never change.
I upload the imag eto the same bucket but a different folder.
  function upload(contentType, data, next) {
    console.log('Function: upload');
    s3.putObject({
        Bucket: bucket,
        Key: dstFilePath,
        Body: data,
        ContentType: contentType,
        CacheControl: "max-age=314496000,immutable"
      },
      next);
  }
Here is the full index.js with some error handling:
var async = require('async');
var AWS = require('aws-sdk');
const gm = require('gm').subClass({imageMagick: true, binPath: "/opt/bin"});
const imagemin = require('imagemin');
const imageminJpegRecompress = require('imagemin-jpeg-recompress');
const imageminJpegtran = require('imagemin-jpegtran');
const imageminPngquant = require('imagemin-pngquant');

// get reference to S3 client
var s3 = new AWS.S3();

/**
 * Get enable to use memory size in ImageMagick
 * Typically we determine to us 90% of max memory size
 * @see https://docs.aws.amazon.com/lambda/latest/dg/lambda-environment-variables.html
 */
const getEnableMemory = () => {
  const mem = parseInt(process.env.AWS_LAMBDA_FUNCTION_MEMORY_SIZE, 10);
  return Math.floor(mem * 90 / 100);
};

exports.handler = function (event, context, callback) {
  // Read options from the event.
  //console.log("Reading options from event:\n", util.inspect(event, {depth: 5}));
  var bucket = event.Records[0].s3.bucket.name;

  // Object key may have spaces or unicode non-ASCII characters.
  var filePath = decodeURIComponent(event.Records[0].s3.object.key.replace(/\+/g, " "));
  var dstFilePath = filePath.replace(/^uploads\//g, "optimized/");

  // Infer the image type.
  var typeMatch = filePath.match(/\.([^.]*)$/);
  if (!typeMatch) {
    callback("Could not determine the image type.");
    return;
  }

  var imageType = typeMatch[1].toLowerCase();
  async.waterfall([
      function download(next) {
        // Download the image from S3 into a buffer.
        s3.getObject({
            Bucket: bucket,
            Key: filePath
          },
          next);
      },
      function transformBuffer(response, next) {
        gm(response.Body)
          .limit("memory", `${getEnableMemory()}MB`)
          .autoOrient()
          .size(function(err, size) {
          this.toBuffer(imageType, function(err, buffer) {
              if (err) {
                next(err);
              } else {
                next(null, response.ContentType, buffer);
              }
            });
        });
      },
      function optimize(contentType, buffer, next) {
        imagemin.buffer(buffer, {
          plugins: [
            imageminJpegRecompress(),
            imageminJpegtran(),
            imageminPngquant({
              quality: [0.6, 0.8]
            })
          ]
        }).then(function(optimizedImage) {
          next(null, contentType, optimizedImage);
        }, function (err) {
          next(err);
        });
      },
      function upload(contentType, data, next) {
        s3.putObject({
            Bucket: bucket,
            Key: dstFilePath,
            Body: data,
            ContentType: contentType,
            CacheControl: "max-age=314496000,immutable"
          },
          next);
      }
    ], function (err) {
      if (err) {
        console.error(
          'Unable to resize ' + bucket + '/' + filePath +
          ' and upload to ' + bucket + '/' + dstFilePath +
          ' due to an error: ' + err
        );
      } else {
        console.log(
          'Successfully resized ' + bucket + '/' + filePath +
          ' and uploaded to ' + bucket + '/' + dstFilePath
        );
      }

      callback(null, "message");
    }
  );
};
My package.json with my depedencies:
{
  "name": "optimize-images",
  "version": "1.0.0",
  "description": "",
  "main": "index.js",
  "engines": {
    "node": ">=12.10 <13.0",
    "npm": ">=6.11.3"
  },
  "dependencies": {
    "async": "^3.1.0",
    "aws-sdk": "^2.596.0",
    "gm": "^1.23.1",
    "imagemin": "^7.0.1",
    "imagemin-jpeg-recompress": "^6.0.0",
    "imagemin-jpegtran": "^6.0.0",
    "imagemin-mozjpeg": "^8.0.0",
    "imagemin-pngquant": "^8.0.0"
  },
  "devDependencies": {
    "serverless": "^1.60.4"
  }
}
The issues
This looks good and should work. However, when you run npm install on your local computer you will get dependencies
specific to your system and OS. If we just copy them and add to Lambda we will get all kinds of weird errors about
missing executables.
I solved that issue by using Docker. So I am building my image from an image very similar to what I use in production. I install some dependencies and then run NPM install. When everything looks good inside the docker image I’m using Serverless to deploy.
Here is my Dockerfile:
FROM lambci/lambda:build-nodejs12.x

RUN yum install -y libpng-devel libjpeg-devel libwebp-tools libglvnd-glx libXi

COPY package*.json ./
RUN npm install

COPY index.js index.js
COPY serverless.yml serverless.yaml

CMD ./node_modules/.bin/serverless deploy
ImageMagic issues on Lambda nodejs10 and nodejs12
On the nodejs8 Lambda runtime Amazon included ImageMagic, but that is not true for nodejs10 and later. So we need to provide an extra layer to our Lambda. (Using a “layer” is the AWS way to add libraries to your runtime). I found this Gitbub repository which provides a layer you can easily deploy. I just clicked the “Deploy” button, waited 5 minutes and I got a new private layer in my AWS account.
The layer add the required libraries in /opt/bin. That is why we need to tell ImageMagic to look in that folder.
I took my new layer ARN and added it to my serverless.yml:
service:
  name: image-optimize

provider:
  name: aws
  runtime: nodejs12.x
  region: eu-central-1
  memorySize: 1024
  iamRoleStatements:
    - Effect: "Allow"
      Action:
        - "s3:GetObject"
      Resource: "arn:aws:s3:::my-image-bucket/*"
    - Effect: "Allow"
      Action:
        - "s3:PutObject"
      Resource: "arn:aws:s3:::my-image-bucket/*"

functions:
  s3_statements:
    handler: index.handler
    timeout: 12
    layers:
      - arn:aws:lambda:eu-central-1:000000000000:layer:image-magick:1
    events:
      - s3:
          bucket: my-image-bucket
          event: s3:ObjectCreated:*
          existing: true
          rules:
            - prefix: uploads/
Deploy
That is pretty much it. Now Im ready for deployment. I created my bucket in the AWS console then I run the following commands:
export AWS_ACCESS_KEY_ID="xxxxxx"
export AWS_SECRET_ACCESS_KEY="yyyyyy"

docker build -t optmize-images .
docker run --rm -e AWS_ACCESS_KEY_ID -e AWS_SECRET_ACCESS_KEY optmize-images
Now when I upload a file to my-image-bucket/uploads the image will be optimized and added in my-image-bucket/optimized.
It will also work for subdirectories.
Happy coding!


Leave a Comment